
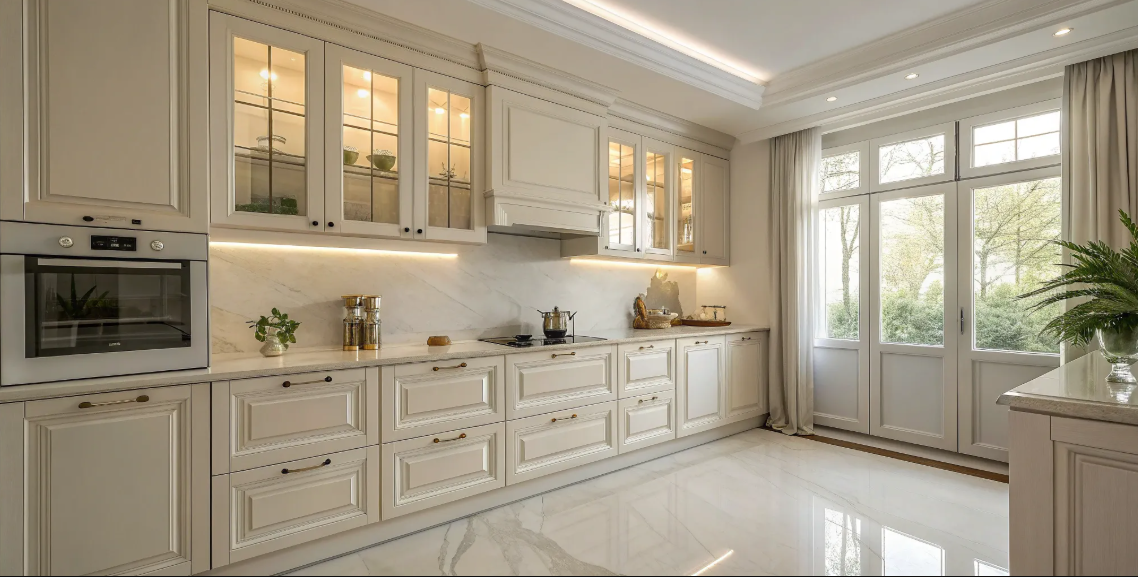
Think about what your kitchen cabinets endure every single day. They’re slammed shut, bumped by pots, and exposed to a constant stream of grease, steam, and sticky fingers. This is not a job for standard wall paint. Cabinets are high-touch, high-traffic surfaces that demand a finish designed for resilience. They need a protective shell that can resist moisture, scuffs, and stains while being easy to clean. Choosing the best paint for kitchen cabinets is less about decoration and more about performance. It’s the critical first step in ensuring your kitchen looks fresh and new for years, not just a few months.
Key Takeaways
- Prep Work Is Non-Negotiable: A beautiful, long-lasting finish starts before you even open the paint can. Thoroughly cleaning, sanding, and using a high-quality bonding primer are the most critical steps for ensuring your paint adheres properly and resists chipping.
- Sheen Equals Durability: For a busy kitchen, a semi-gloss finish is the ideal choice. It creates a hard, resilient surface that’s incredibly easy to clean, perfectly balancing a professional look with the toughness required for daily use.
- Patience Creates a Perfect Finish: Achieve that smooth, factory-like look by applying several thin coats of paint, not one thick one. It's just as important to allow the paint to fully cure for several days or weeks so it hardens completely and stands up to future wear and tear.
Why the Right Paint for Your Cabinets Is a Big Deal
Choosing a paint color for your kitchen cabinets feels like the main event, but the type of paint you choose is what really determines the success of your project. The right paint can completely transform your kitchen, giving it a durable, factory-like finish that stands the test of time. The wrong one, however, can lead to chips, stains, and a whole lot of frustration down the road. It’s about more than just aesthetics; it’s about investing in a finish that can handle the demands of a busy kitchen, protect your home's value, and save you from the headache of a premature repaint.
What Your Kitchen Cabinets Endure Daily
Think about what your kitchen cabinets go through in a single day. They’re opened and closed constantly, bumped by pots and pans, and exposed to a steady stream of steam, grease, and food splatters. This isn't a job for regular wall paint. Because cabinets get so much use, they need special paint and careful prep to avoid chipping. A high-quality cabinet paint is formulated to create a hard, durable shell that resists moisture and is easy to clean. It’s the first line of defense in keeping your kitchen looking fresh, which is why our professional cabinet painting services focus on using the best materials for the job.
How a Fresh Coat Affects Your Home's Value
A professional cabinet refresh is one of the most impactful updates you can make to your kitchen, and it directly affects your home's value. A smooth, durable finish makes the entire room feel newer, cleaner, and more modern. Quality saves money in more ways than one. When you invest in good paint upfront, you avoid having to repaint sooner, which costs more time and money in the long run. Potential buyers notice these details, too. A beautifully finished kitchen can be a major selling point, while chipped, poorly painted cabinets can be a red flag. It’s a smart investment that pays off, as you can see in our project portfolio.
The True Cost of a Cheap Paint Job
It can be tempting to cut costs with budget-friendly paint, but this is one area where you truly get what you pay for. A cheap paint job often means a weak finish that peels, chips, and scuffs with the slightest contact. The problem isn't just the paint itself; cheap tools can make it harder to get a smooth finish, leaving you with visible brush strokes and roller marks. More importantly, a budget approach often means rushing the prep work, which is the most important part of a good paint job. Skipping proper cleaning, sanding, and priming will cause even the best paint to fail, leading to a full do-over that costs far more than doing it right the first time.
A Breakdown of the Best Paint Types for Cabinets
Walking down the paint aisle can feel overwhelming. With so many cans and labels, how do you know which one will give you that durable, beautiful finish you’re dreaming of for your kitchen? The secret is that not all paints are created equal, especially when it comes to high-traffic areas like kitchen cabinets. They need to stand up to daily use, from sticky fingers to splatters and steam.
Choosing the right type of paint is the first and most important step in any cabinet painting project. It’s the foundation for a finish that not only looks fantastic but also lasts for years. Forget the standard wall paint you have in the garage—cabinets require a formula designed for durability and a smooth, hard finish. We’ll walk through the main categories, from traditional oil-based paints to modern water-based and hybrid formulas, so you can understand what the pros use and why. This will help you make an informed decision, whether you’re discussing options with a contractor or just want to know what goes into a quality paint job.
Oil vs. Water-Based: Which Is Right for You?
The classic debate in the paint world often comes down to oil versus water. Traditional oil-based paints are known for their incredible durability and ability to level out into a perfectly smooth, brush-stroke-free finish. However, they come with strong fumes, a long drying time, and require mineral spirits for cleanup. Because of this, most professionals agree that applying oil-based paint is a job best left to a team with the right ventilation and experience.
On the other hand, modern water-based paints, often called latex paints, have come a long way. High-quality formulas are now incredibly durable and offer the major advantages of low odor, fast drying times, and simple soap-and-water cleanup. For most homeowners, a premium water-based paint is the more practical and user-friendly choice.
Exploring Hybrid and Specialty Formulas
What if you could get the best of both worlds? That’s where hybrid paints come in. These are often called waterborne alkyd or urethane alkyd paints. They are designed to give you the hard, durable finish and smooth application of an oil-based paint but with the easy cleanup and low fumes of a water-based formula. These hybrids are fantastic for cabinets because they create a tough, furniture-grade finish that resists chipping and scuffs. They are a top choice for many professional painters who want to deliver exceptional results without the drawbacks of traditional oil paints. When you see a perfectly smooth, resilient cabinet finish, there’s a good chance a hybrid paint was used.
What to Look For on the Label
When you’re looking at paint cans, a few keywords can tell you a lot about the quality and performance. Look for terms like "enamel," which indicates the paint will dry to a hard, durable shell. Words like "acrylic," "urethane," and "alkyd" also signal a tougher formula designed for trim and cabinets. For the easiest application and cleanup, make sure the label also says "water-based" or "waterborne."
Just as important as the paint itself is the primer. A great paint job always starts with a great foundation. Using a high-quality bonding primer is non-negotiable for cabinets, as it ensures the paint will adhere properly and won’t peel or chip. This is a critical step in all of our residential painting services.
A Quick Note on VOCs and Kitchen Safety
Your kitchen is the heart of your home, so the air quality in that space matters. This is where VOCs, or Volatile Organic Compounds, come into play. These are chemicals that are released into the air as paint dries and can have a strong odor. Many modern paints are formulated to be "low-VOC" or "zero-VOC," which means fewer fumes and a healthier indoor environment for your family. High-quality water-based and hybrid paints offer excellent durability without the harsh solvents found in older oil-based paints. This makes them a safer and more pleasant choice for an interior project, especially in a busy space like the kitchen.
Our Top Picks: The Best Cabinet Paint Brands Reviewed
Choosing the right paint is one of the most critical decisions you'll make for your cabinet project. The market is filled with options, and it’s easy to feel overwhelmed. To help you out, we’ve put together a list of the top cabinet paint brands that professionals and savvy DIYers trust. We’re looking at factors like durability, ease of application, and the quality of the final finish. After all, you want a paint job that not only looks beautiful but can also handle the daily wear and tear of a busy kitchen.
The ALLBRiGHT Approach: Professional Cabinet Painting
At ALLBRiGHT PAINTING, we believe a flawless finish starts with a premium product. While the right technique is essential, even the most skilled painter can’t make a low-quality paint perform well. We’ve spent years testing different brands on countless cabinet refinishing projects to find the ones that deliver consistent, durable, and beautiful results. Our process combines meticulous prep work with top-tier paints to create a factory-like finish that lasts. This commitment to quality is why homeowners trust us to bring their vision to life and ensure their investment looks great for years to come.
Sherwin-Williams Emerald Urethane
This is a team favorite for a reason. Sherwin-Williams Emerald Urethane is a hybrid paint that gives you the best of both worlds: the durability of an oil-based paint with the easy cleanup of a water-based one. It levels out incredibly well, minimizing brush and roller marks for a smooth, spray-like finish. Once it cures, it’s highly resistant to scratches and scuffs. While it’s one of the more expensive options on the shelf, its low odor and low VOC formula make it a much more pleasant product to work with inside your home.
Benjamin Moore Advance
Benjamin Moore Advance is another top-tier choice that we often recommend. Like the Sherwin-Williams Emerald, it’s a waterborne alkyd that provides a tough, furniture-quality finish. One of its biggest selling points is that it doesn't require a separate top coat, which can save you a step in the painting process. It has excellent self-leveling properties, creating a smooth surface that looks professionally done. According to a detailed review by Jenna Kate at Home, its durability makes it a fantastic investment for high-traffic kitchens.
INSL-X Cabinet Coat
If you're looking for fantastic quality without the premium price tag, INSL-X Cabinet Coat is a strong contender. This urethane-acrylic formula is known for its exceptional adhesion, which means it sticks well to even tricky surfaces with proper prep. It dries to a hard, durable finish that resists chipping, scuffing, and food stains. While it can be a bit more challenging to use in a sprayer, it applies beautifully with a brush or roller, making it a versatile and reliable choice for achieving a fresh, clean look in your kitchen.
General Finishes Milk Paint
Don’t let the name fool you—this isn’t the traditional, rustic milk paint you might be thinking of. General Finishes Milk Paint is a modern, acrylic-based paint that’s incredibly user-friendly. It’s a favorite among DIYers because it has excellent adhesion and often requires minimal prep beyond a light sanding. It also dries and cures faster than many other paints on this list. While it is one of the more expensive options, its ease of use and durable finish make it a worthwhile consideration, especially for those tackling their own cabinet project.
Valspar Cabinet & Furniture
Valspar is a trusted and widely available brand that offers a solid paint specifically formulated for cabinets and furniture. This oil-enriched enamel is designed to provide a strong, fade-resistant finish that stands up to cleaning and daily use. It’s a reliable workhorse product that delivers a smooth, professional-looking result without breaking the bank. Because you can find it at most big-box hardware stores, it’s an accessible option for many homeowners looking for a dependable paint to refresh their kitchen.
Behr Urethane Alkyd
As a more budget-friendly option, Behr’s Cabinet, Door & Trim Enamel is often considered by homeowners looking to save on costs. However, it’s important to go in with realistic expectations. Some users have reported that this paint can feel tacky long after it should have dried and may be more prone to chipping than its premium counterparts. For high-traffic areas like kitchen cabinets, investing in a more durable paint is often the better long-term solution to avoid premature touch-ups and repairs.
How to Pick the Perfect Paint Finish
Choosing a paint color gets all the attention, but the finish you select is just as crucial for your kitchen cabinets. The finish—or sheen—determines how the paint looks, how durable it is, and how easy it will be to clean. Think of it as the final piece of the puzzle that brings both beauty and function to your kitchen. A great finish protects your cabinets from the daily wear and tear of a busy home. Let’s walk through the most popular options so you can find the perfect match for your space and lifestyle.
Satin, Semi-Gloss, or High-Gloss?
The world of paint finishes can feel a little overwhelming, but for kitchen cabinets, it usually comes down to three key players. A satin finish offers a soft, subtle glow that’s more durable and easier to clean than a flat or matte paint. It’s a fantastic middle-ground option that hides minor imperfections well and provides a sophisticated, velvety look without being too shiny.
Semi-gloss is the most popular choice for a reason. It has a noticeable shine that reflects light, brightening up your kitchen and making the details of your cabinetry pop. It’s also incredibly durable and simple to wipe down, making it ideal for a high-traffic area. For a bold, modern statement, a high-gloss finish delivers maximum shine and durability. Just be aware that its reflective surface will highlight any dings or flaws.
Which Finish Is the Most Durable?
When it comes to standing up to daily life, a semi-gloss finish is the clear winner for kitchen cabinets. Kitchens are hardworking spaces—they face everything from splatters and steam to sticky fingers and frequent opening and closing. You need a paint that can handle it all without chipping or fading.
A semi-gloss finish creates a hard, resilient surface that resists moisture and stains. This durability means your beautifully painted cabinets will look fresh for years to come, not just for a few months. While high-gloss is technically just as tough, semi-gloss provides that perfect balance of a professional look and the resilience needed for the heart of your home. It’s the go-to for a finish that is as tough as it is beautiful.
Factoring in Cleaning and Maintenance
Think about how often you’ll be wiping down your cabinets. If you have young children or do a lot of cooking, ease of cleaning is a top priority. This is where shinier finishes have a real advantage. The smoother and less porous the surface, the easier it is to clean without damaging the paint.
A semi-gloss finish is a dream to maintain; a quick wipe with a damp cloth is usually all it takes to remove smudges and food splatters. A satin finish is also quite easy to clean and has the added benefit of hiding fingerprints a bit better than its shinier counterpart. While you can clean any finish, the less sheen a paint has, the more scrubbing it may require, which can wear down the paint over time.
Tips for Choosing a Color You'll Love
Once you’ve landed on a finish, it’s time to lock in your color. To avoid any regrets, always test your top contenders in your kitchen first. Paint can look completely different on a swatch in a store than it does on your cabinets. Your kitchen’s unique lighting—both natural and artificial—will dramatically change how a color appears throughout the day.
Instead of painting splotches directly on your cabinets, buy a few samples and paint them on poster boards. Move them around the room at different times to see how they look in the morning light and under your kitchen lights at night. This simple step is the best way to feel confident in your decision and ensure you’ll be happy with your choice long after the paint has dried.
How to Apply Cabinet Paint Like a Pro
Achieving a finish that looks like it came straight from a factory is entirely possible, but it demands patience and attention to detail. The difference between a DIY job and a professional one often comes down to following a proven process. If you’re ready to tackle the project, these are the steps that will get you the durable, beautiful results you’re looking for.
Step 1: Prep Your Surfaces (Don't Skip This!)
I can’t say this enough: preparation is everything. It’s tempting to jump right into painting, but skipping this step will guarantee a finish that chips and peels. Start by giving your cabinets a thorough cleaning with a degreaser to remove any built-up grime and oil. Once they’re dry, lightly sand every surface. You’re not trying to strip the old finish, just scuff it up enough for the primer to grab onto. Finally, fill any dings or holes with wood filler and sand it smooth. This is the most labor-intensive part of the process, but it’s the foundation for a lasting finish. It's the meticulous prep work that truly defines a professional cabinet painting job.
Step 2: Prime for a Perfect Base
Once your cabinets are clean and scuffed, it’s time for primer. Primer is non-negotiable—it ensures the paint adheres properly, blocks stains from bleeding through, and provides a uniform base so your color looks rich and even. For slick surfaces like cabinets, a high-quality bonding primer is your best friend. It’s specifically designed to stick to tricky surfaces that regular paint would slide right off of. Apply a thin, even coat of primer to all your cabinet doors, drawers, and frames. Let it dry completely according to the manufacturer's instructions before you even think about picking up your paint color. This step is your insurance policy for a durable, long-lasting finish.
Step 3: Choose Your Tools: Brush, Roller, or Sprayer?
The tools you use will have a major impact on your final result. For the absolute smoothest, most professional-looking finish, a paint sprayer is the way to go. It delivers a fine, even mist of paint that eliminates brush strokes and roller marks. However, sprayers have a learning curve and require careful setup. If you’re not ready for that, a combination of a high-quality angled brush and a mini high-density foam roller is an excellent alternative. Use the brush for cutting in on detailed areas and corners, and the roller for flat surfaces like door panels. Don’t skimp on your tools—a cheap brush will leave bristles behind, ruining your perfect finish.
Step 4: Apply Thin, Even Coats
The secret to a flawless finish isn’t one thick coat of paint; it’s several thin ones. A thick coat is more likely to drip, sag, and take forever to dry properly. Instead, apply a light, even layer of paint and let it dry completely. Once it’s dry, give it a very light sanding with fine-grit sandpaper (220-grit is perfect) to knock down any tiny bumps or dust particles. Wipe away the dust with a tack cloth, and then apply your next thin coat. You’ll likely need at least two coats of paint over your primer for full, even coverage. This method takes more time, but the silky-smooth result is absolutely worth the effort.
Step 5: Let It Cure (Patience Is Key)
Your cabinets might feel dry to the touch within a few hours, but they are far from cured. Curing is the process where the paint fully hardens and becomes durable enough for daily use. This can take anywhere from a few days to a few weeks, depending on the paint and your home's humidity levels. During this time, be extra gentle with your cabinets. Avoid scrubbing them or placing heavy objects against them. If you can, wait as long as possible before re-installing the doors and drawers. Rushing this final step can lead to nicks, scratches, and smudges on your brand-new finish.
Common Mistakes to Avoid for a Flawless Finish
Painting cabinets is a marathon, not a sprint. The most common mistake is rushing through any of the steps, especially the prep work and the drying time. Another pitfall is using cheap paint or tools, which will always show in the final product. If you notice a drip or an uneven spot while you’re painting, it’s best to let it dry, then lightly sand it smooth before applying the next coat. Trying to fix wet paint often makes it worse. If the process feels overwhelming, remember that there’s no shame in calling for help. A professional residential painting team has the experience and equipment to deliver a perfect finish without the stress.
Keeping Your Cabinets Looking New
Once the final coat of paint is dry, the real work of enjoying your beautiful new kitchen begins. But keeping that fresh, flawless look requires a little know-how. Life happens—splatters, scuffs, and fingerprints are inevitable. The good news is that with a few simple strategies for maintenance and quick fixes, you can keep your cabinets looking like they were just painted for years to come. Think of it as protecting your investment. Here’s how to handle common issues and care for your newly painted cabinets so they stay in pristine condition.
What to Do if Your Paint Won't Stick
There’s nothing more frustrating than seeing fresh paint peel or chip. If your paint isn’t adhering properly, the culprit is almost always inadequate prep work. Grease, grime, or a glossy old finish can prevent the new paint from grabbing hold. The best defense is a good offense: thorough cleaning and sanding before you even think about painting. But if you’re already in a sticky situation, the solution lies in the primer. Using a high-quality bonding primer is essential. These primers are specifically formulated to create a super-strong bond between a tricky surface and your topcoat. It’s the single most important step to ensure your paint sticks well and gives you a durable, long-lasting finish.
How to Fix an Uneven Finish
Achieving that perfectly smooth, factory-like finish is the goal, but sometimes you’ll spot tiny bumps, drips, or brush marks. Don’t worry—this is an easy fix. The secret weapon is fine-grit sandpaper. Lightly sanding with 220-grit sandpaper between each coat of paint works wonders. This quick step smooths out any minor imperfections and gives the surface a bit of "tooth," which helps the next coat of paint stick even better. It’s a small detail that makes a huge difference in achieving the best cabinet paint finish. If you notice a drip after the paint has dried, just carefully sand it down until it’s smooth and then apply a thin touch-up coat to that spot.
Getting the Color Just Right
You’ve found the perfect shade of greige on a paint chip, but once it’s on the cabinets, it looks completely different. This happens all the time because lighting has a massive impact on color. Your kitchen’s unique combination of natural and artificial light can change a color’s undertones dramatically. Before you commit to painting every cabinet door, always test your color choices. Get paint samples—peel-and-stick versions are great because they’re mess-free—and place them on different cabinets. Observe how they look in the morning light, under your kitchen’s evening lights, and on a cloudy day. This simple step ensures you’ll love the final color no matter the time of day.
A Simple Guide to Cleaning and Long-Term Care
Your newly painted cabinets may feel dry to the touch in a few hours, but the paint needs much longer to fully cure and harden. Curing is the chemical process where the paint develops its final durability, and it can take anywhere from a week to a month. It’s crucial to be gentle during this time. According to Magnolia Home’s paint experts, you should wait at least seven days before you start cleaning the surface. For routine cleaning, use a soft cloth or sponge with a mild soap-and-water solution. Avoid harsh chemicals or abrasive scrubbers, as they can damage the finish. A little gentle care will go a long way in preserving your beautiful paint job.
Quick and Easy Touch-Up Tricks
Even with the most durable paint, occasional nicks and scratches are bound to happen. The key is to address them quickly before they get worse. This is where your leftover paint comes in handy. For tiny touch-ups, a small artist's brush is your best friend—it gives you much more control than a regular paintbrush. If you see a small chip, you might need to lightly sand the edges to make them smooth before dabbing on a thin layer of paint. For drips or uneven spots that you missed earlier, just sand them smooth and repaint the small area. These quick fixes will keep your cabinets looking flawless.
How to Properly Store Leftover Paint
Don’t just toss your leftover paint in the garage and forget about it. Storing it correctly is essential for future touch-ups. First, make sure the can is sealed as tightly as possible. You can do this by cleaning the rim of the can, placing the lid back on, and gently tapping it with a rubber mallet to create an airtight seal. To go the extra mile, place a piece of plastic wrap over the opening before putting the lid on. Store the can upside down in a cool, dry place away from direct sunlight and extreme temperatures. This prevents a skin from forming on top of the paint and ensures it will be ready to use when you need it.
Related Articles
- Should You Repaint or Replace Your Kitchen Cabinets
- The Ultimate Guide to Painting Cabinets Like a Pro
Frequently Asked Questions
I have leftover wall paint. Can I just use that on my cabinets? It’s a tempting shortcut, but you should definitely avoid using regular wall paint on your cabinets. Wall paint is designed for a low-contact surface and simply isn't tough enough to handle the daily wear and tear of a kitchen. Cabinets need a specialized enamel paint that dries to a hard, durable shell, capable of resisting chips, scuffs, and frequent cleaning. Using the wrong paint will almost certainly lead to a frustrating and short-lived finish.
Do I really have to sand my cabinets before painting? Yes, this is the one step you absolutely cannot skip. Sanding isn't about stripping the old finish completely; it's about scuffing up the surface to give the primer something to grip. A smooth, glossy surface offers nothing for the new paint to adhere to, which is the primary reason for peeling and chipping down the road. Think of it as the foundation of your entire project—without it, everything else will eventually fail.
With all the options, what's the single best type of paint for cabinets? For the best combination of professional-grade durability and user-friendliness, most experts choose a waterborne alkyd paint, also known as a hybrid enamel. These paints give you the hard, furniture-quality finish and smooth application of an oil-based paint but with the low odor and easy, water-based cleanup. They create a tough surface that stands up beautifully to the demands of a busy kitchen.
My cabinets feel dry after a few hours. Is it safe to put everything back? This is a common mistake that can ruin a perfect paint job. While your cabinets may feel dry to the touch, the paint is still curing, which is the chemical process of it hardening to its maximum durability. This can take anywhere from a few days to a few weeks. If you reinstall hardware and start using your cabinets too soon, you risk causing permanent nicks, smudges, and scratches. Patience during the curing phase is key to a long-lasting finish.
What's the most popular and practical finish for kitchen cabinets? A semi-gloss finish is the go-to choice for kitchen cabinets, and for good reason. It provides a hard, durable surface that is incredibly easy to wipe down, making it ideal for a space that sees a lot of splatters and fingerprints. The subtle shine also reflects light, which can help brighten your kitchen and make your cabinet details pop. It strikes the perfect balance between a beautiful, professional look and the resilience needed for the heart of your home.